
Using Google Maps in Family History Research
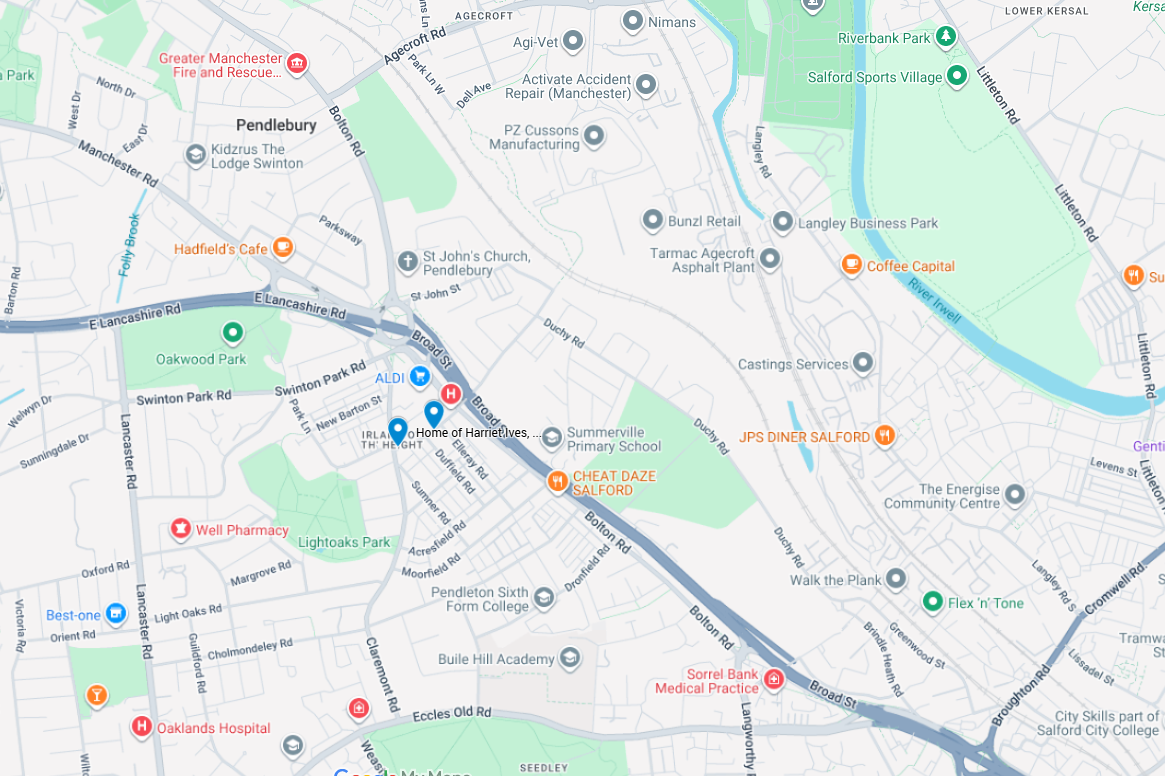
A lot of my ancestors came from England and Ireland. If your ancestors travelled from places that you can’t easily get to (without spending a LOT of money), it can be challenging to really get a feel for how they lived, what they saw each day, and what their neighbourhood was like. Was it a busy town or city, or was it a farm, or a rural area? How would they have travelled around?
One tool I started using regularly was Google Maps. Maps can’t of course show you what a street might have looked like 100 years ago, or more, but it can give you some great insights nonetheless. And looking at a street view of a spot where your great-great-grandfather or someone once lived, whether it is the same building or not, can be a lovely feeling. (I discovered that my maternal grandfather lived just around the corner from where I live now, before he got married. His house is long gone, and is now a block of apartments, but I love that I can walk past it every day and think of him.) Seeing where an ancestor lived, went to school, went to church, or got married can really make them feel more alive and familiar.
Many of us use Google Maps daily, and are familiar with many of the features, especially on our phones. But there are some great feature that work best on a computer and are really helpful for family history research. One of the best features for genealogists is the ability to save and organise places into custom lists. These are essentially digital folders for your family's addresses, locations, and landmarks.
Here’s a step-by-step guide to using Google Maps to put your ancestors on the map.
Step 1: Create a Custom Map for Your Family
The first thing you’ll want to do is create a custom map. This keeps all of your genealogy-related locations separate from your personal “favourites” lists (like “home” or “work” or “Mum and Dad’s”).
· On your computer, go to Google My Maps. (This feature is best set up on a desktop or laptop, but you can view your custom maps on your phone.)
· Click Create a new map.
· Give your map a title and description. Make it clear, so as you build new ones, you’ll be able to differentiate them. Some of mine are things like “Walker Family in Manchester UK” or “Walkers in 1800s Australia.”
Step 2: Add and Organise Your Historical Addresses
This is where start to build journeys and life stories in maps. As you find addresses in census records, city directories, or title deeds, you'll add them to the relevant map.
· In the search bar, type in the address you want to save (e.g., “65 Claremont Rd, Manchester, UK”).
· Click the Add to map button that appears.
· The location will be added to a new layer, which acts like a folder. You can rename this layer to categorise your places.
Tip: Use Layers to Categorize Your Research
Layers are a helpful way to keep your map organised. You can create different layers for different purposes. Some of mind include:
· By Ancestor: Create a separate layer for each family line. For example, “Rev Walker’s Addresses”.
· By Time Period: Organise locations by decade or a significant event, such as “1800s census locations” or “post-marriage addresses”.
· By Location Type: Use layers to group different kinds of places, like “Cemeteries” or “Churches” or, if you have them, “Places of Employment”.
Step 3: Add Notes, Photos, and Details
Once you've added a location to your map, you can click on the pin to edit it. This feature is great, and makes it feel very personalised.
· Add a Name: Change the generic address to something more meaningful, like “G-G-G-Grandmother Harriet’s Childhood Home”.
· Add Notes: Use the description box to include details from your research. Mention the year your ancestor lived there, who else was in the household (you can usually find this on the census), or any interesting stories associated with the address.
· Add Photos: If you have historical photos of the location, or the person at the time you think they lived there, you can upload them to the pin. This makes the map a truly interactive family album.
Step 4: Explore the Past with Street View and Historical Overlays
Google Maps isn't just for looking at the present. It offers incredible features for stepping back in time.
· Street View: When you click on a pin, you can often enter Street View to get a 360-degree look at the location today, just like you would in the main Map features. While the building may have changed, you can get a feel for the neighbourhood and see if any landmarks remain. In some areas, Google even has historical Street View imagery, allowing you to see what a location looked like in previous years.
· Historical Map Overlays: While not a native Google Maps feature, many third-party sites offer historical map overlays that you can use with Google Earth (which is a related tool). These can show you how street names have changed or what buildings stood in a specific location a century ago.
Step 5: Share Your Discoveries
One of the best parts of using Google Maps for genealogy is that it's easy to share. You can send a link to your custom map to family members, allowing them to explore and appreciate the journey of their ancestors as well.
· Click the Share button on your map to get a shareable link or invite collaborators to add their own findings.
By using Google Maps to save and organise your family's historical addresses, you're not just creating a list—you're creating a dynamic, visual timeline of your family's history. It's a fun and insightful way to connect with your roots and share your discoveries with the next generation.
If you’ve used Google Maps in this way, and have any other useful tips or insights, please comment and share!
